
discord.py API
discordpy.readthedocs.io/en/latest/
Welcome to discord.py
discordpy.readthedocs.io
위 사이트에서 discord.py에 대한 설명을 볼 수 있다.
그리고 영어다
powershell이나 cmd 창에서 아래와 같이 입력해 discord.py를 설치하자
python3 -m pip install -U discord.py[voice]혹시나 wsl로 Ubuntu를 사용하고 있다면 아래와 같이 입력하자. (" "가 생겼다.)
python3 -m pip install -U "discord.py[voice]"
명령어 받기
#run.py
import discord

client = discord.Client()

@client.event
async def on_ready():
    print('We have logged in as {0.user}'.format(client)) #봇이 실행되면 콘솔창에 표시

@client.event
async def on_message(message):
    if message.author == client.user: # 봇 자신이 보내는 메세지는 무시
        return

    if message.content.startswith('$hello'): # 만약 $hello로 시작하는 채팅이 올라오면
        await message.channel.send('Hello!') # Hello!라고 보내기

client.run('your token here') #토큰
위 코드를 실행하면 서버의 봇이 온라인으로 표시된다.
함수 이름(startswith)에서 알 수 있듯이 명령어 뒤에 아무말이다 써도 작동하게 된다.
안에 들어가있는 문자열로 시작되기만 하면 true를 반환하는 것 같다.
혹시나 message.content가 string과 비교되는지 해봤다
#run.py
import discord
client = discord.Client()
@client.event
async def on_ready():
print('We have logged in as {0.user}'.format(client)) #봇이 실행되면 콘솔창에 표시
@client.event
async def on_message(message):
if message.author == client.user: # 봇 자신이 보내는 메세지는 무시
return
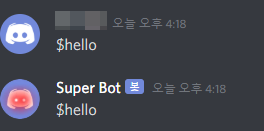
if message.content == '$hello': # 만약 채팅이 '$hello'라면
await message.channel.send('Hello!') # Hello!라고 보내기
client.run('your token here') #토큰정확하게 입력해야만 대답이 돌아온다. 이 맛에 개발하지
원하는 명령어를 추가해보자!
discord.ext.commands
위와 같이 코딩하면 명령어를 설정할때마다 $같은 접두사(prefix)를 붙여주어야 한다.
이것도 설정할 수가 있다.
discordpy.readthedocs.io/en/latest/ext/commands/api.html
API Reference
discordpy.readthedocs.io
왠지 extension의 약자일것 같은 ext는 명령어에 대한 상세한 설정이 가능하다.
import asyncio, discord
form discord.ext import commands
bot = commands.Bot(command_prefix="$") #접두사를 $로 지정
@bot.event
async def on_ready():
print("We have logged in as {0.user}".format(bot))
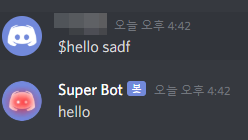
@bot.command()
async def hello(ctx):
await ctx.send("Hello!")
bot.run("your token here") #토큰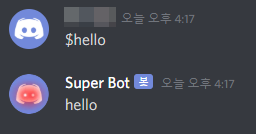
잘 작동된다.
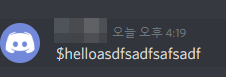

실험 결과 자신이 보낸 메세지는 무시하고 뒤에 이상한거 붙이면 안된다.
다만 띄어쓰기 후 적는 것은 작동한다. 아마 뒤에 파라미터를 받기 위해서인듯 하다 (ex $주사위 6)
이런 경우에는 아까 것과 합쳐서 인수를 받는 함수만 이런식으로 사용하면 될 것 같다.
마지막으로 정의되지 않은 명령어에 대한 대답을 만들어 보자.
1시간 반동안 찾아 헤맸다
import asyncio, discord
from discord.ext import commands
bot = commands.Bot(command_prefix="$")
@bot.event
async def on_ready():
print("We have loggedd in as {0.user}".format(bot))
@bot.command()
async def hello(ctx):
await ctx.send("hello")
@bot.event
async def on_command_error(ctx, error):
if isinstance(error, commands.CommandNotFound):
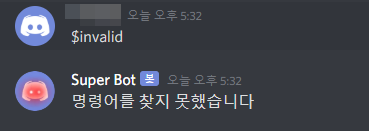
await ctx.send("명령어를 찾지 못했습니다")
bot.run('your token here')아까 정의되지 않은 명령어를 입력했을때 콘솔창에 뜬 오류는 CommandNotFound였다.
on_command_error()는 특정 명령어가 아닌 모든 명령어에 대한 에러를 다룬다.
위 코드를 실행하면 아래와 같이 뜬다.
다음엔 주사위게임을 만들어보자
'프로젝트 > 디스코드 봇' 카테고리의 다른 글
| 디스코드 봇 만들기#5 - 음악재생 (2) | 2021.02.05 |
|---|---|
| 디스코드 봇 만들기#4 - 음성채널 (7) | 2021.01.29 |
| 디스코드 봇 만들기#3 - 간단한 주사위 게임 (2) | 2021.01.22 |
| 디스코드 봇 만들기#1 - 개발 준비하기 (3) | 2021.01.08 |
| 디스코드 봇 만들기#0 - 프로젝트 개요 (0) | 2021.01.01 |